Netis WF2419I Router Hacking Diary
Introduction
I had an old (2014-ish) and cheap (if I recall correctly it cost me around 15-20 €) Netis WF2419I [1] router collecting dust in a cabinet at home. Its performance has always been lackluster with the WiFi connection dropping and restarting every few minutes. I bought it to serve as a guest AP for my dorm while I was studying in Padova. It worked dutifully for a few years there but, after I moved, I've never used it any more and switched to a whole different setup (which I hope to describe in another post) with more powerful hardware.
This router was almost forgotten, until I read an excellent article by George Hilliard [2] about hacking Reolink cameras. I had no plans to use this device in any case, given that it is rather old and crappy. So reading the article was enough to spark my interest in trying to reverse engineer and add as much new functionality as possible to this piece of hardware (or, perhaps, should I say "junk"?). It surely won't be missed if something goes wrong in the process.
First off I set myself some goals to keep me on track:
- Open the router and identify chipset, RAM, FLASH size and serial port
- Dump the flash contents and inspect them
- Rebuild a bootable image from the extracted contents and flash it
- Setup a working buildroot image and compile a statically-linked busybox
- Compile a (hopefully working) custom kernel for the device
As you can see, each goal somewhat depends on the previous one. Moreover, it's my firt time that I try something like this and some of those goals are not easy. Murphy's law gets you every time and I have encountered many roadblocks during this journey. In writing, I will not spare any of the details, including the MANY failed attempts. That's why I'm calling this page a diary.
At the time of writing I'm quite far from completion and I have somewhat abandoned the project. I may reboot it in the future so, perhaps, I might decide to split this post into a series.
All the code and raw notes I have produced are available on GitHub.
Opening up the Device & Talking to the Serial Port
Opening the device and finding the serial port has been the easy part. Actually, before rushing to the screwdriver to open the chassis, I searched for the FCC ID of the device on the back of the unit. Every RF device needs to be FCC certified to be sold and imported in the US [3] and this router is no exception. I found the FCC ID on the lower-right corner of the label: T58WF2419R. By searching for this ID on the official FCC website or on fccid.io I already had access to many low-level details about the router, including internal photos, without the need to open it. Not that opening it was a big deal. The warranty is already expired so no worries.
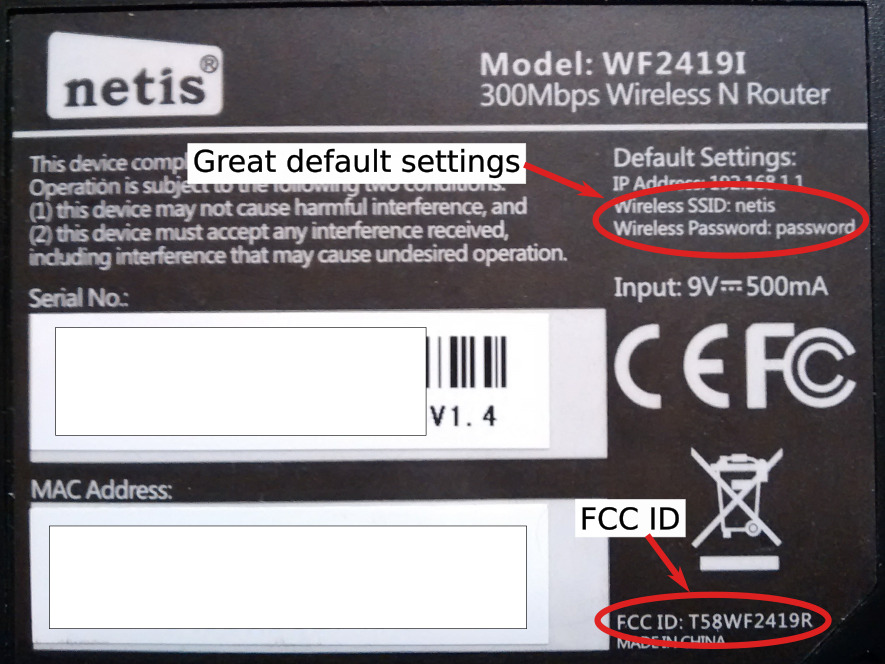
Stop wandering around the FCC website reading test reports! Given my goals, I need access to the flash chip so I have to open the device anyway. This was as easy as just removing the two screws on the bottom side (one is hidden by the mandatory 'warranty void if seal is broken' sticker, about which I couldn't care less) and popping open the case.
With the case open, the following components appeared before me onto the sea of green of the board and are highlighted in the picture below:
- Realtek RTL8196C - the main router chipset
- Realtek RTL8192CE - WiFi chipset
- Winbond W25Q32FV - 32Mbit (4MB) SPI FLASH memory
- ESMT M12L128168A - 2M x 16 Bit x 4 Banks (16MB) SDRAM
- A few test points, probably for JTAG and UART access
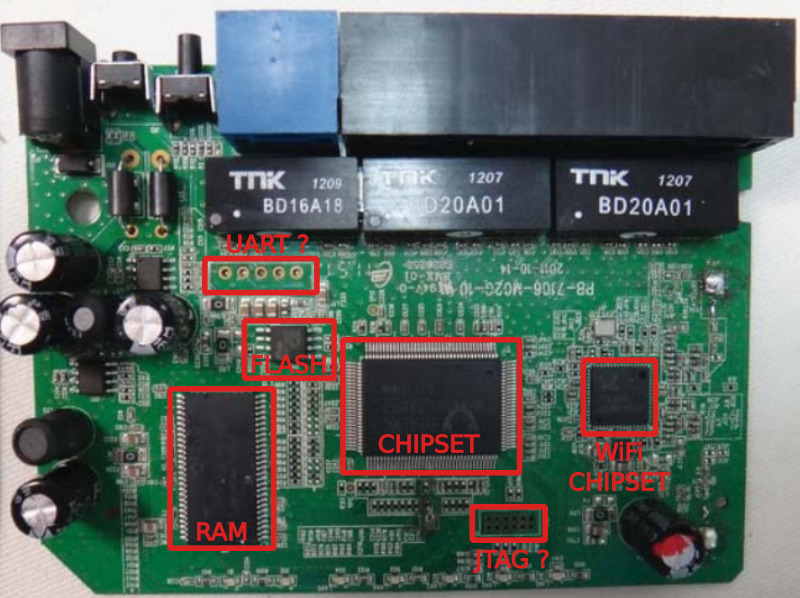
The usual first step is to see if a serial port is exposed somewhere on the board in order to have access to a shell on the device. As shown in the picture above, just by looking at the board, I already identified a few suitable testpoints. Just to be sure and also for future use, I looked up on my favourite search engine for the main router chipset datasheet. As expected, somebody (thank you!) released a confidential copy of the document [4]. I neglected all the other details for the moment and scrolled right-ahead to the pinout, looking for a serial port of some kind.
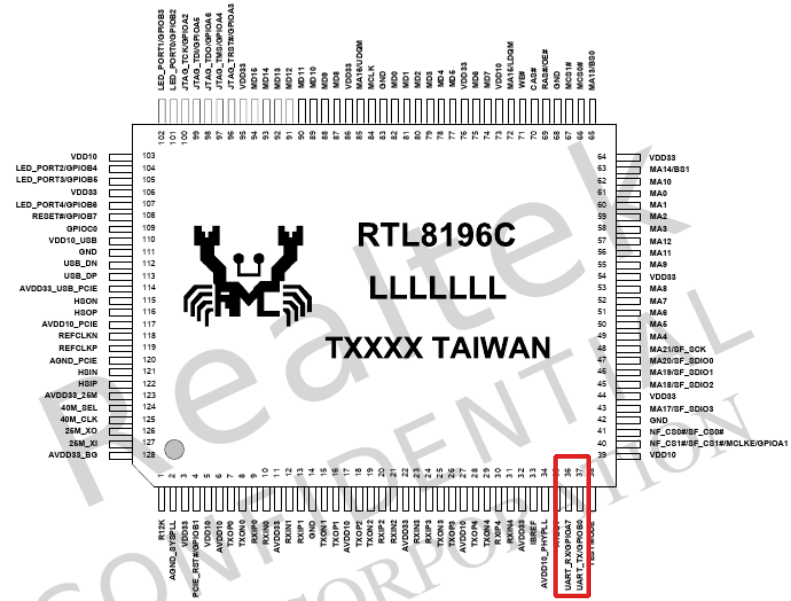
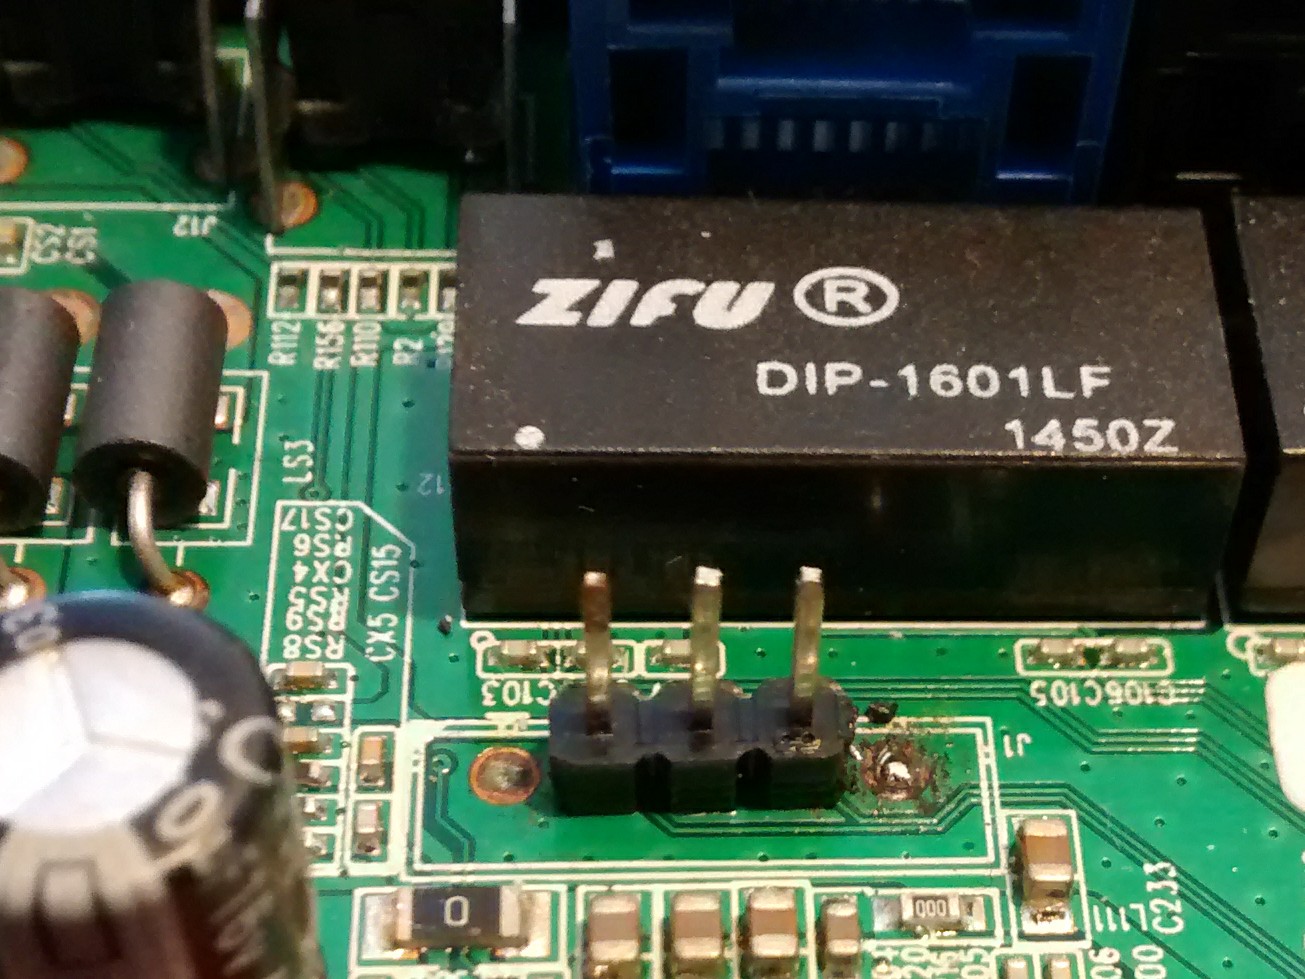
In the above picture I cut the relevant part of the datasheet, showing the pinout of the chip. In the bottom-right part there are two pins (pin 36 and 37) labelled UART_RX/GPIOA7 and UART_TX/GPIOB0 respectively. Those pins can be configured either as GPIOs (for controlling the router LEDs etc.) or as a serial port. I traced those two pins with a multimeter and they are routed to the unpopulated header labelled J1. Most likely, they are the serial port I'm looking for. Time to solder a pin header and connect a TTL to USB adapter and see who's there. But HEY! Wait! What's the baud rate? A quick check with an oscilloscope revealed it's 38400bps. I know using an oscilloscope for this task it's a bit of an overkill, but I had one on hand so why not using it? By the way, some trial and error works too.
After connecting a TTL to serial adapter and issuing
$ screen -L /dev/ttyUSB0 38400 When the router boots, the following messages appear on my terminal:
=============================

<Probe SPI #0 >

1.Manufacture ID=0xef

2.Device ID=0x40

3.Capacity ID=0x16

4.Winbond SPI (4 MByte)!

5.Total sector-counts = 1024(sector=4KB)

6.spi_flash_info[0].device_size = 22

01_8198_SFCR(b8001200) =1f800000

01_8198_SFCR2(b8001204) =bb08000

01_8198_SFCSR(b8001208) =d8350000


---RealTek(RTL8196C)at 2014.08.29-12:43+0800 version v1.1c [16bit](390MHz)

no sys signature at 00010000!

no sys signature at 00020000!

Jump to image start=0x80500000...

decompressing kernel:
Uncompressing Linux... done, booting the kernel.
done decompressing kernel.
RTL8192C-RTL8188C driver version 1.5 (2012-05-04)

serial console detected.  Disabling virtual terminals.

init started:  BusyBox v1.00-pre8 (2015.01.23-06:46+0000) multi-call binary


BusyBox v1.00-pre8 (2015.01.23-06:46+0000) Built-in shell (msh)
Enter 'help' for a list of built-in commands.

cp: /etc/tmp/pics*: No such file or directory
WARNING [factory_args.c:check_and_restore_factory_args:623]: current: [0x2adb521c], the length is zero!
50
 4.8d.38.c2.74.9c.0.0.0.0.0.0.
save_param load /var/ppp/.pppoe.session
len = 0
wlan_check.sh: do nothing......
===================================================================================
dnrd --cache=off  &
WWW:netiscc, len:9

domain:netis.cc, len:8

WWW2:wwwnetiscc, len:13

domain2:www.netis.cc, len:12

killall: xhcatv: no process killed
killall: multi_ppp: no process killed
killall: igmpproxy: no process killed
killall: udhcpc: no process killed
wlanapp_sh:2042:@@@@@@@####;wlan0
MIB_HW_TX_POWER_CCK_A=302f2f2f2f2e2e2e2e2d2d2d2d2c
MIB_HW_TX_POWER_CCK_A_new=302f2f2f2f2e2e2e2e2d2d2d2d2c
MIB_HW_TX_POWER_HT40_1S_A=302f2f2f2f2e2e2e2e2d2d2d2d2c
MIB_HW_TX_POWER_HT40_1S_An=302f2f2f2f2e2e2e2e2d2d2d2d2c
MIB_HW_TX_POWER_HT20=ffffffffffffffffffffffffffff
MIB_HW_TX_POWER_HT20n=ffffffffffffffffffffffffffff
MIB_HW_TX_POWER_DIFF_OFDM=6161616161616161616161616161
MIB_HW_TX_POWER_DIFF_OFDMn=6161616161616161616161616161
SIOCGIFFLAGS: No such device
bridge br0 doesn't exist; can't delete it
SIOCDELRT: No such process
SIOCDELRT: No such process
dhcp is dis----------------------------------------------
wlanapp_sh:2042:@@@@@@@####;wlan0 wlan0-va0 wlan0-va1 wlan0-va2 wlan0-va3 wlan0-vxd
iapp: not found
wlanapp_sh:2334:wlan0:wlan0:wlan0-va3
ip:192.168.1.1 mask:255.255.255.0 gw:192.168.1.254
SIOCDELRT: No such process
iwcontrol RegisterPID to (wlan0)
* Setup Firewall
port trigger stop.
port trigger init, wan is eth1.
port trigger start.
doamin=3
* Start NTP daemon
/proc/sys/net/ipv4/conf/all/arp_ignore: cannot create
/proc/sys/net/ipv4/conf/default/arp_ignore: cannot create
iwpriv wlan0 set_mib bcnint=25--
netis(WF2419I)-V2.12.36123,2015.06.30 16:47.
time.windows.com: Unknown host
========================END init.sh===============================
321
348
/bin/ota_init.sh: not found
351
/bin/cdrom_wizard: not found
killall: boa: no process killed
365
366
telnetd.sh: not found
# killall: boa: no process killed
[run_webs_server_by_execv:46:restart_webs.c]
Starting Protocol Module: HTTP Server                      ... OK
create_server_socket-357:Bind err!caught SIGTERM, starting shutdown
exiting Boa normally (uptime 1 seconds)
Starting Protocol Module: HTTP Server                      ... OK

#
Good. It looks like the router offers a root command prompt on the serial port. I poked around a bit and tried some commands to gain some info on the hardware and software of the device:
# ls
bin		etc		media		sbin		tmp		var
dev		lib		proc		sys			usr		web

# mount
/dev/mtdblock1 on / type squashfs (ro)
none on /proc type proc (rw)
tmpfs on /var type tmpfs (rw)

# df
Filesystem           1k-blocks      Used Available Use% Mounted on
/dev/mtdblock1            2048      2048         0 100% /
tmpfs                     6144       176      5968   3% /var

# cat /proc/cmdline
root=/dev/mtdblock1 console=0 single

# cat /proc/cpuinfo
system type		: Philips Nino
processor		: 0
cpu model		: R3000 V0.0
BogoMIPS		: 389.12
wait instruction	: yes
microsecond timers	: no
tlb_entries		: 32
extra interrupt vector	: no
hardware watchpoint	: no
VCED exceptions		: not available
VCEI exceptions		: not available
ll emulations		: 0
sc emulations		: 0

# cat /proc/version
Linux version 2.4.18-MIPS-01.00 (root@netcore) (gcc version 3.4.6-1.3.6) #1 Tue Jun 30 16:56:20 CST 2015

# busybox
BusyBox v1.00-pre8 (2015.01.23-06:46+0000) multi-call binary

Usage: busybox [function] [arguments]...
   or: [function] [arguments]...

	BusyBox is a multi-call binary that combines many common Unix
	utilities into a single executable.  Most people will create a
	link to busybox for each function they wish to use, and BusyBox
	will act like whatever it was invoked as.

Currently defined functions:
	[, adduser, arping, bunzip2, busybox, bzcat, cat, chmod, cp, cut,
	date, df, echo, egrep, expr, false, ftpget, grep, head, ifconfig,
	init, kill, killall, klogd, ln, logger, login, ls, mkdir, mknod,
	mount, msh, passwd, ping, ps, reboot, rm, route, sh, sleep, syslogd,
	tail, test, tftp, traceroute, true, umount, vconfig, wc, wget
Quite an ancient software stack. Isn't it?
Now that I have grabbed some basic information about the system it's time to move on and see what's inside the flash chip.
Dumping The Flash Contents
I had already identified the chip by visual inspection while opening the router: it is a Winbond W25Q32FV chip. Time to download its datasheet [5] to get the pinout and connect it to my beloved Bus Pirate [6]. The Bus Pirate is a small and useful board to talk to and interact with digital stuff. Out of the box it supports the following interfaces: 1-Wire, 2-Wire, 3-Wire, I2C, SPI, JTAG, UART and LCD. Alternatively, the GPIO pins can be directly controlled and many more protocols can be added using aftermarket firmware images since it is all open source.
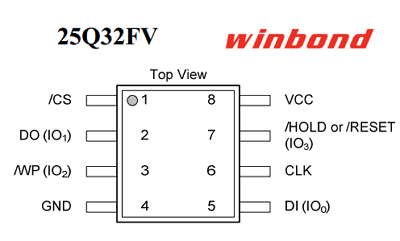
Now that I know the pinout of the chip, I have to figure out how to connect it for flashrom [7] to read it. I'll try In-System Programming (ISP) [8] first since it is much quicker and does not require reworking the board every time I have to read or write the flash contents. If this won't work the only solution is to desolder and resolder the flash chip from the board every time. This is time consuming and I'd like to avoid it at all cost.
By means of a quick reverse engineering of the traces around the chip, I found out that pin 3 and pin 7 (/WP and /HOLD respectively) which, according to [7] should be connected to 3.3V on the bus pirate, are already tied to the VCC pin (pin 8). Therefore, only 6 out of the 8 required wires have to be connected.
After twenty minutes spent with my trusty soldering iron and a piece of an old ATA cable (the 80-wire version which uses smaller conductors) and I have created a nice little connector ready to be plugged into the Bus Pirate socket.
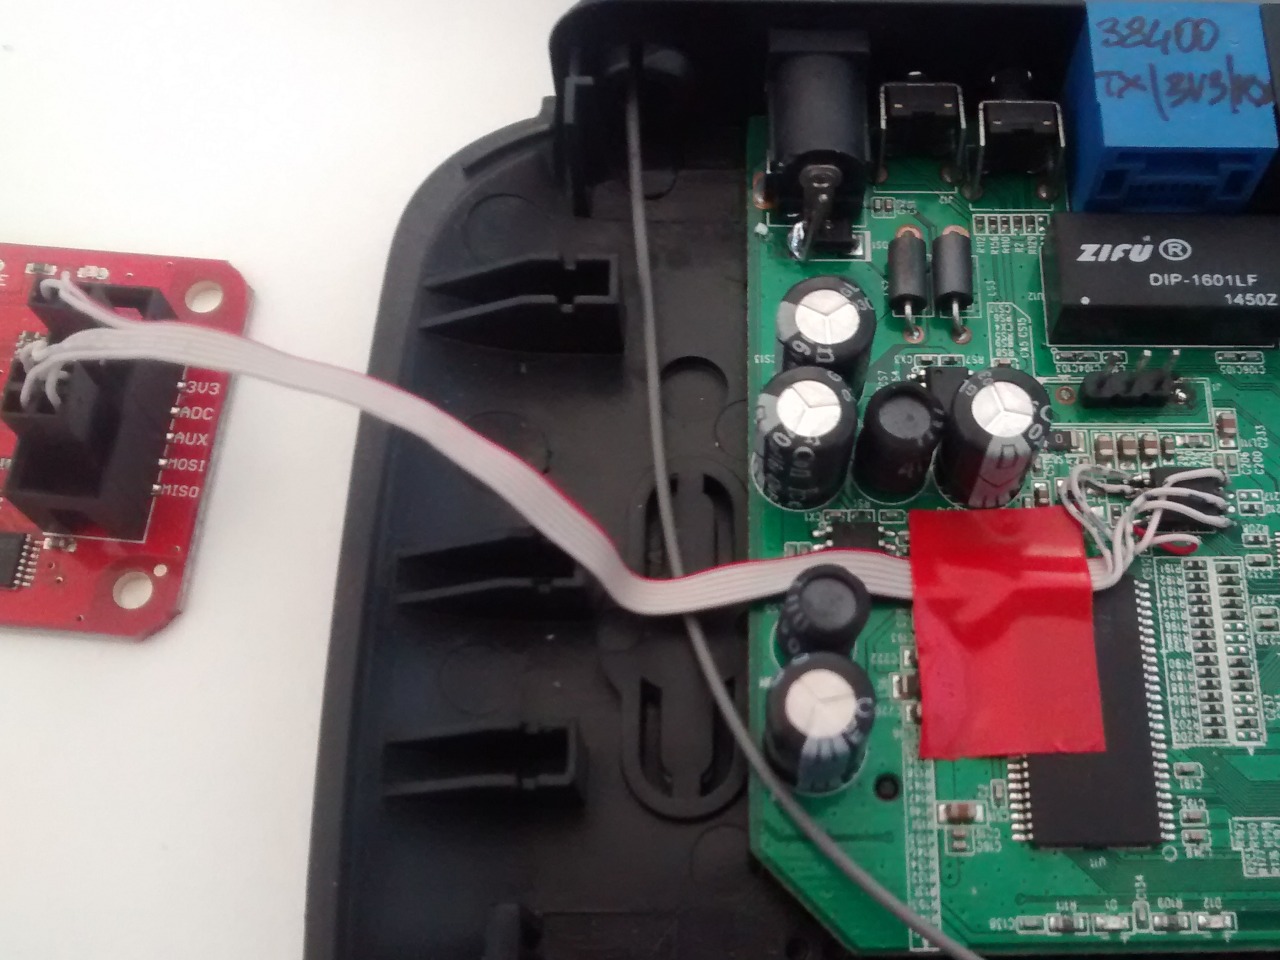
To check for a successful connection I issued the following command:
$ sudo flashrom -p buspirate_spi:dev=/dev/ttyUSB0,spispeed=2M
[sudo] password for pol:
flashrom v1.2 on Linux 5.7.0-2-amd64 (x86_64)
flashrom is free software, get the source code at https://flashrom.org

Using clock_gettime for delay loops (clk_id: 1, resolution: 1ns).
Found Winbond flash chip "W25Q32.V" (4096 kB, SPI) on buspirate_spi.
No operations were specified.
Hurray! The flash chip was recognized correctly. Time to dump its contents.
$ sudo flashrom -p buspirate_spi:dev=/dev/ttyUSB0,spispeed=2M -r firmware_orig.bin To see what's inside the image named firmware_orig.bin I extracted it recursively with the following command. At the end of the process binwalk creates a folder named _firmware_orig.bin.extracted containing the files extracted from the various file systems it found.
$ binwalk -e firmware_orig.bin

DECIMAL       HEXADECIMAL     DESCRIPTION
--------------------------------------------------------------------------------
4976          0x1370          LZMA compressed data, properties: 0x5D, dictionary size: 8388608 bytes, uncompressed size: 68320 bytes
207888        0x32C10         LZMA compressed data, properties: 0x5D, dictionary size: 8388608 bytes, uncompressed size: 2338816 bytes

WARNING: Extractor.execute failed to run external extractor 'sasquatch -p 1 -le -d 'squashfs-root' '%e'': [Errno 2] No such file or directory: 'sasquatch', 'sasquatch -p 1 -le -d 'squashfs-root' '%e'' might not be installed correctly

WARNING: Extractor.execute failed to run external extractor 'sasquatch -p 1 -be -d 'squashfs-root' '%e'': [Errno 2] No such file or directory: 'sasquatch', 'sasquatch -p 1 -be -d 'squashfs-root' '%e'' might not be installed correctly
851968        0xD0000         Squashfs filesystem, big endian, version 2.0, size: 2076096 bytes, 389 inodes, blocksize: 65536 bytes, created: 2015-06-30 08:57:47
Or that was the expectation. What are those warnings and why is my folder squashfs-root empty? Apparently sasquatch is not installed in my system and
$ sudo apt search sasquatch does not return any result. Alright it's not the first time I have to compile and install something from source on my system. It's strange however that the Debian repos are missing this useful piece of software. Perhaps I could volunteer as its maintainer? Not today. I have a router to hack now. Sasquatch is downloaded from [9] and build.sh does all the requisite stuff for building and installing.
As usual, the process is never as easy as running a single command. The build failed with a ton of messages like the following:
/usr/bin/ld: unsquashfs_xattr.o:/tmp/article/sasquatch/squashfs4.3/squashfs-tools/error.h:34: multiple definition of `verbose'; unsquashfs.o:/tmp/article/sasquatch/squashfs4.3/squashfs-tools/error.h:34: first defined here
collect2: error: ld returned 1 exit status
make: *** [Makefile:298: sasquatch] Error 1
By looking at the issues and pull requests of sasquatch I found pull request #34 which should fix the issue. After applying it to my local copy of the code the compilation is successful. I'm now ready to go ahead with the extraction.
$ binwalk -eM firmware_orig.bin

Scan Time:     2020-08-21 10:55:58
Target File:   /tmp/article/firmware_orig.bin
MD5 Checksum:  f03a657d0fd666ef7b281b178160aa6f
Signatures:    391

DECIMAL       HEXADECIMAL     DESCRIPTION
--------------------------------------------------------------------------------
4976          0x1370          LZMA compressed data, properties: 0x5D, dictionary size: 8388608 bytes, uncompressed size: 68320 bytes
207888        0x32C10         LZMA compressed data, properties: 0x5D, dictionary size: 8388608 bytes, uncompressed size: 2338816 bytes
851968        0xD0000         Squashfs filesystem, big endian, version 2.0, size: 2076096 bytes, 389 inodes, blocksize: 65536 bytes, created: 2015-06-30 08:57:47


Scan Time:     2020-08-21 10:55:59
Target File:   /tmp/article/_firmware_orig.bin.extracted/1370
MD5 Checksum:  b11f1fa953d791774f180b80c290370e
Signatures:    391

DECIMAL       HEXADECIMAL     DESCRIPTION
--------------------------------------------------------------------------------


Scan Time:     2020-08-21 10:55:59
Target File:   /tmp/article/_firmware_orig.bin.extracted/32C10
MD5 Checksum:  db44ecba377a764a82135b385d6711cd
Signatures:    391

DECIMAL       HEXADECIMAL     DESCRIPTION
--------------------------------------------------------------------------------
674704        0xA4B90         Certificate in DER format (x509 v3), header length: 4, sequence length: 31
1517048       0x1725F8        Certificate in DER format (x509 v3), header length: 4, sequence length: 130
1939552       0x1D9860        Linux kernel version 2.4.18
1947112       0x1DB5E8        Unix path: /usr/lib/libc.so.1
Great. The image contains some LZMA compressed data, probably kernel and bootloader, and a squashfs file system [10]. This time binwalk recursively extracted those files and what I got was in fact a kernel (version 2.4.18 of course), some certificates and the contents of the root file system. I was now able to inspect and modify the image contents as I please. The expert reader (or my future self if he learned something from this endeavour) may already have noticed the first mistake here. If nothing above looks wrong fasten your seat belt we're going deep down a rabbit hole.
Rebuilding the Flash Image and First Roadblocks
This is the root folder structure of the extracted image:
$ ls -l _firmware_orig.bin.extracted/squashfs-root/
total 0
drwxr-xr-x 2 pol pol 3580 Jun 30  2015 bin
drwxrwxrwx 2 pol pol   60 Jun 30  2015 dev
drwxrwxrwx 3 pol pol  600 Jun 30  2015 etc
drwxr-xr-x 2 pol pol  320 Jun 30  2015 lib
lrwxrwxrwx 1 pol pol   10 Sep 11 12:39 media -> /var/media
drwxrwxrwx 2 pol pol   40 Jun 30  2015 proc
drwxr-xr-x 2 pol pol  180 Jun 30  2015 sbin
lrwxrwxrwx 1 pol pol    8 Sep 11 12:39 sys -> /var/sys
lrwxrwxrwx 1 pol pol    8 Sep 11 12:39 tmp -> /var/tmp
drwxr-xr-x 4 pol pol   80 Jun 30  2015 usr
drwxrwxrwx 2 pol pol   40 Jun 30  2015 var
drwxr-xr-x 8 pol pol  300 Jun 30  2015 web
To test if the image extraction and rebuild processes work correctly, the easiest thing to do is modify the index.htm file of the router configuration webpage and add some test code to it. I copied the directory firmware_orig.bin.extracted and its contents to firmware.extracted_new in order to preserve the original files. Then I modified firmware.extracted_new/squashfs-root/web/index.htm by appending the following lines just before the closing html tag.
<script>
	alert("I have been pwned!");
</script>
This should display an alert window as soon as the page is loaded.
Save and close (:wq) and that's it. Now it's time to rebuild the image and see if it boots. But before attempting to re-create it, I needed more details about the file system structure.
$ unsquashfs -s D0000.squashfs
Reading a different endian SQUASHFS filesystem on D0000.squashfs
Found a valid big endian SQUASHFS 2:0 superblock on D0000.squashfs.
Creation or last append time Tue Jun 30 10:57:47 2015
Filesystem size 2076096 bytes (2027.44 Kbytes / 1.98 Mbytes)
Block size 65536
Filesystem is not exportable via NFS
Inodes are compressed
Data is compressed
Fragments are compressed
Always-use-fragments option is not specified
Check data is not present in the filesystem
Duplicates are removed
Number of fragments 27
Number of inodes 389
umber of uids 1
Number of gids 0
The Lazy Way (Failed)
The first root file system creation attempt I did was using the version of squashfs-tools provided by the Debian packages (version 4.4 at the time of writing).
$ mksquashfs squashfs-root D0000.new.squashfs -b 65536 -all-root -noappend

$ unsquashfs -s D0000.new.squashfs
Found a valid SQUASHFS 4:0 superblock on D0000.new.squashfs.
Creation or last append time [... redacted ...]
Filesystem size 2788625 bytes (2723.27 Kbytes / 2.66 Mbytes)
Compression gzip
Block size 65536
Filesystem is exportable via NFS
Inodes are compressed
Data is compressed
Uids/Gids (Id table) are compressed
Fragments are compressed
Always-use-fragments option is not specified
Xattrs are compressed
Duplicates are removed
Number of fragments 26
Number of inodes 366
Number of ids 1
Apart from the different superblock version, we have that the file system size is bigger, the endiannes is gone and the number of inodes is lower than the original image. What is going on? I decided to tackle one issue at a time.
First of all is the squashfs file system backwards-compatible? Apparently, SquashFS v4.0 moved to a fixed little-endian format (even for big-endian systems). Given the differences, the odds of the new image booting are already quite low. For the sake of science I decided to test the new image anyway.
$ cp ../firmware_orig.bin firmware_pwned.bin
$ dd if=D0000.new.squashfs of=firmware_pwned.bin bs=1 seek=$((0xD0000)) conv=notrunc
$ sudo flashrom -p buspirate_spi:dev=/dev/ttyUSB0,spispeed=2M -w firmware.extracted_new/firmware_pwned.bin
And sure enough when I turned on the router, carefully monitoring the serial output, the device was unable to mount the root file system and it was stuck in a bootloop.
The Hard Way
Of course it could not be so easy. I needed an older version of squashfs, supporting setting a different endiannes. Is there a different/lower version of squashfs-tools in the Debian repos? Of course not. I had to compile it my own. Who cares I'm already used to that. The first thing I did was to download the squashfs sources for version 2.2-r2. And once again the stock sources cannot be compiled with gcc 10. I learned, after trial and error, that this is due to different gcc behaviour and due to some symbols moved to different header files. To get this squashfs-tools version compile on my system I had to apply the following changes:
$ diff -u squashfs2.2-r2/squashfs-tools squashfs-tools
--- squashfs2.2-r2/squashfs-tools/Makefile	2005-09-01 01:21:14.000000000 +0200
+++ squashfs-tools/Makefile	2020-08-17 14:39:16.792112129 +0200
@@ -1,6 +1,7 @@
 INCLUDEDIR = .

-CFLAGS := -I$(INCLUDEDIR) -D_FILE_OFFSET_BITS=64 -D_LARGEFILE_SOURCE -g
+CFLAGS := -I$(INCLUDEDIR) -D_FILE_OFFSET_BITS=64 -D_LARGEFILE_SOURCE -g -O2 \
+	-fcommon -std=gnu89

 mksquashfs: mksquashfs.o read_fs.o sort.o
	$(CC) mksquashfs.o read_fs.o sort.o -lz -o $@
--- squashfs2.2-r2/squashfs-tools/mksquashfs.c	2005-09-09 00:34:28.000000000 +0200
+++ squashfs-tools/mksquashfs.c	2020-08-17 14:42:08.037022333 +0200
@@ -28,6 +28,7 @@
 #include <unistd.h>
 #include <stdio.h>
 #include <sys/types.h>
+#include <sys/sysmacros.h>
 #include <sys/stat.h>
 #include <fcntl.h>
 #include <errno.h>
Figuring out why the code was not building and what to do to make gcc accept it took me quite a while. However, now that I have a working copy of mksquashfs version 2, I tried again to rebuild the file system:
$ squashfs/squashfs2.2-r2/squashfs-tools/mksquashfs squashfs-root D0000.new.squashfs -b 65536 -all-root -noappend -2.0 -be

$ unsquashfs -s D0000.new.squashfs
Reading a different endian SQUASHFS filesystem on D0000.new.squashfs
Found a valid big endian SQUASHFS 2:0 superblock on D0000.new.squashfs.
Creation or last append time Wed Sep 23 14:15:42 2020
Filesystem size 2785979 bytes (2720.68 Kbytes / 2.66 Mbytes)
Block size 65536
Filesystem is not exportable via NFS
Inodes are compressed
Data is compressed
Fragments are compressed
Always-use-fragments option is not specified
Check data is not present in the filesystem
Duplicates are removed
Number of fragments 26
Number of inodes 366
Number of uids 1
Number of gids 0
The issue about endiannes and superblock version were solved. There was still a different number of inodes and a bigger file system size. But hey, who cares right? I flashed it into the router right-away, repeating the steps in the previous section, but the device is still stuck in a boot loop.
What are those missing inodes anyway? I thought that maybe extracting the SquashFS file system manually will yield more information.
$ unsquashfs D0000.squashfs
Reading a different endian SQUASHFS filesystem on D0000.squashfs
read_ids: Bad inode count in super block
File system corruption detected
FATAL ERROR:failed to read file system tables
Now I'm getting why binwalk was using sasquatch to extract the root file system image. Let's do the same
$ sasquatch D0000.squashfs
SquashFS version [512.0] / inode count [-2063532032] suggests a SquashFS image of a different endianess
Reading a different endian SQUASHFS filesystem on D0000.squashfs
Parallel unsquashfs: Using 1 processor
Trying to decompress using default gzip decompressor...
Trying to decompress with lzma...
Trying to decompress with lzma-adaptive...
Detected lzma-adaptive compression
369 inodes (439 blocks) to write


create_inode: could not create character device squashfs-root/dev/ptyp0, because you're not superuser!

[... lots of lines as the one above ...]

created 237 files
created 20 directories
created 109 symlinks
created 0 devices
created 0 fifos
This was one of those moments when you realize you were barking up the wrong tree all the time. Facepalm. The missing inodes are the character devices [11]. Of course nothing will boot! Upon extraction, binwalk did not have the required permissions to create such files. I have to extract the file system as root to get the whole contents of the image:
$ sudo sasquatch D0000.squashfs
[sudo] password for pol:
SquashFS version [512.0] / inode count [-2063532032] suggests a SquashFS image of a different endianess
Reading a different endian SQUASHFS filesystem on D0000.squashfs
Parallel unsquashfs: Using 1 processor
Trying to decompress using default gzip decompressor...
Trying to decompress with lzma...
Trying to decompress with lzma-adaptive...
Detected lzma-adaptive compression
369 inodes (439 blocks) to write

[===============================================================|] 439/439 100%

created 237 files
created 20 directories
created 109 symlinks
created 23 devices
created 0 fifos
Now we are talking! Well... not really. I rebuilt the file system once again as I did before, the only difference now is file system size. However, the router is still stuck in a bootloop. A quick check confirmed that the size of the final flash image fits in the flash chip, so the file system size was not the issue. It was a symptom of the issue instead: what was still missing was the correct compression algorithm for mksquashfs. The version 2.2 of mksquashfs does not support lzma compression by default. A working copy of squashfs-lzma [12] was needed. I was fed up of blindly trying stuff until something works, so I downloaded the GPL code [13] (thanks Richard Stallman) for my router model and started inspecting the package contents to find some clues about how the flash image is built.
GPL Code is Fun
Inside the package I found the directory GPL_Code_RTL/rtl819x-sdk-v1.2/AP/squashfs-tools containing some sources for mksquashfs. After copying it somewhere else to preserve the original files, I had to patch the code inside the new directory in a similar fashion as SquashFS 2.2-r2.
$ diff -ru squashfs-tools-orig squashfs-tools/
--- squashfs-tools-orig/Makefile	2013-11-10 14:56:41.000000000 +0100
+++ squashfs-tools/Makefile	2020-08-17 15:37:34.758142333 +0200
@@ -1,7 +1,8 @@
 INCLUDEDIR = .
 LZMAPATH = ./lzma/SRC/7zip/Compress/LZMA_Lib

-CFLAGS := -I$(INCLUDEDIR) -D_FILE_OFFSET_BITS=64 -D_LARGEFILE_SOURCE -O2
+CFLAGS := -I$(INCLUDEDIR) -D_FILE_OFFSET_BITS=64 -D_LARGEFILE_SOURCE -O2 \
+	-fcommon -std=gnu89

--- squashfs-tools-orig/mksquashfs.c	2013-11-10 14:56:41.000000000 +0100
+++ squashfs-tools/mksquashfs.c	2020-08-17 15:38:32.368332562 +0200
@@ -27,6 +27,7 @@
 #include <unistd.h>
 #include <stdio.h>
 #include <sys/types.h>
+#include <sys/sysmacros.h>
 #include <sys/stat.h>
 #include <fcntl.h>
 #include <errno.h>
After that, I compiled the sources with make and I got a fancy new executable to play with: mksquashfs-lzma. It can be used to build the new file system as usual.
$ squashfs/squashfs-tools/mksquashfs-lzma squashfs-root D0000.new.squashfs -b 65536 -all-root -noappend -be After flashing the new image, this time the router booted successfully. I pointed my browser to the configuration page (available at http://192.168.1.1 by default) and logged in with the default credentials. The following webpage appeared.
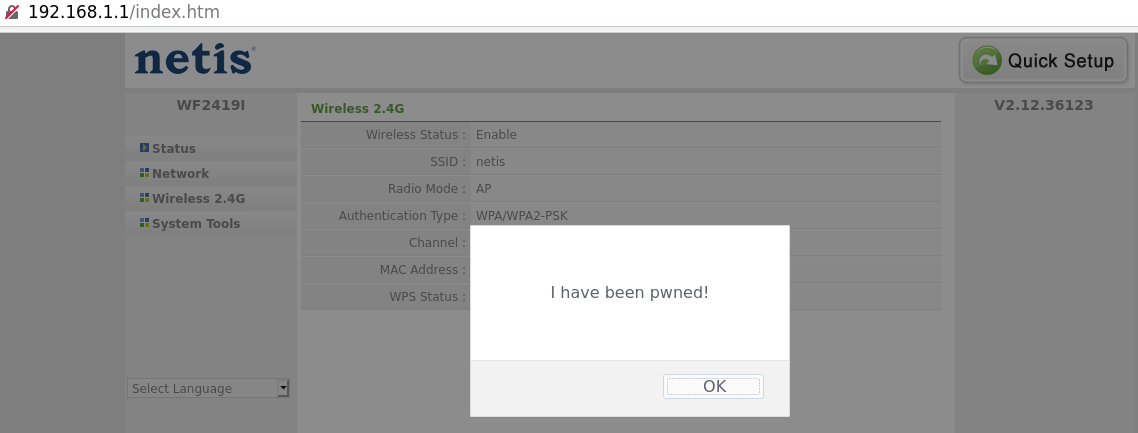
Hurray! This meant that I could do whatever I wanted with the root file system! To avoid manually entering a series of commands every time I want to build a new image, I created a small script available on GitHub [14].
Compiling Software and More Roadblocks
This page is getting long already. Let's recap the ultimate goal: compile a custom kernel for the device. To do so, I need a working compiler for the architecture. This process is streamlined by buildroot: a set of Makefiles and patches that simplifies and automates the process of building a complete and bootable Linux environment for an embedded system [15]. Buildroot downloads and builds the toolchain and utilities it needs for compiling software for the target architecture, applies custom patches to the sources, compiles the software and assembles the final bootable image.
To test the compiler is working, I decided to build a new version of busybox with some added functionality using buildroot. So, the first thing I did was to clone the latest stable buildroot release (2020.08.1 at the time of writing) with
$ git clone git://git.buildroot.net/buildroot $ cd buildroot $ git
checkout 2020.08.1
Then, I tried to build a statically-linked busybox executable with some nice additions to the stock one on the router (such as telnet) using MIPS (big endian) as the target architecture and the stock Generic MIPS32 target architecture variant for buildroot. The command I used are the following:
$ make menuconfig
/*
   Select the desided architecture and build options
   Especially:
	Target options -> Target Architecture -> MIPS (big endian)
	               -> Target Architecture Variant -> Generic MIPS32
	Build options -> libraries -> static only
*/

$ make busybox-menuconfig
/*
   Enable telnetd and disable all the stuff we don't need to make the
   busybox executable small
*/

$ make
/* have a coffe break */
After a few minutes, I found the compiled busybox executable in buildroot/output/target/bin. I copied it as busybox_p (to avoid confusion with the original executable) to the extracted firmware image and created a symlink to it named telnetd. I rebuilt the image as I did many times, flashed it and let the router boot. Sadly this was the result when running the new executable from the serial terminal.
# busybox_p
Illegal instruction
# telnetd
Illegal instruction
Why can't this stuff just work? Maybe the endianness of the executable is wrong, all in all I just guessed it. In the extracted firmware image directory on my PC I ran:
$ file busybox
busybox: ELF 32-bit MSB executable, MIPS, MIPS-I version 1 (SYSV), dynamically linked, interpreter /lib/ld-uClibc.so.0, stripped
$ file busybox_p
busybox_p: ELF 32-bit MSB executable, MIPS, MIPS-I version 1 (SYSV), statically linked, stripped
So the endianness was indeed correct. However, according to the chipset datasheet [4] and some other web resources, the illegal instruction the device was encountering may be due to the core which is a RLX4181 Lexra architecture [16], a variant of the MIPS32 architecture lacking the lwl, lwr, swl and swr instructions, covered by an US patent.
Time to dig into the search engine once again. The following links seemed to point to some useful code:
- hackpascal/0001-binutils-2.24-add-lexra-support.patch
- Working Realtek SoC RTL8196E 97D 97F in last master - For Developers - OpenWrt Forum
- rlx-router/openwrt-rtl8196c
- rlx-router/linux-rlx-upstream
- shibajee/buildroot-rlx4181
The last link contains a complete buildroot repository allegedly supporting the RLX4181 architecture. I added it to my buildroot folder, cleaned it and rebuilt it once again:
git remote add https://notabug.org/shibajee/buildroot
git remote add -f rlx4181-notabug https://notabug.org/shibajee/buildroot
git checkout rlx4181-master
make clean
make menuconfig
/* Select the correct architecture and build options */
make -j4
After a while the executable files were ready. I ran objdump -D on the output executables, grepping for the instructions which are not accepted by the processor. Those commands did not turn any result.
objdump -D root/bin/busybox_p | grep lwl
objdump -D root/bin/busybox_p | grep lwr
objdump -D root/bin/busybox_p | grep swl
objdump -D root/bin/busybox_p | grep swr
Now I was really confident that this time everything will have worked as expected so I rebuilt the flash image and flashed onto the chip. Sadly I was greeted again by the darn Illegal instruction message.
I was starting to suspect that the error was due to the wrong kernel headers version. The actual kernel header files for the Linux version running on the device are available in the GPL code package. So, within my buildroot folder, I issued:
make uclibc-menuconfig To edit the uclibc .config file and set a different directory to fetch the kernel headers.
Pointing uclibc to the original (and quite old) kernel headers did not work either. This time I was unable successfully compile buildroot because I got a bunch of undeclared identifiers in many libraries. This is probably due to the kernel headers lacking the symbols required by the new software I was trying to compile.
Conclusion
Eventually this has been too much for me. I'm calling it quits here. Porting newer software to the older kernel headers to fix the compilation errors is a tedious job. Another option could be to port a newer kernel to the device, but all the kernel sources available on github seem to compile successfully but do not boot properly.
Alternatively, I could try to use an older buildroot version. I have no idea if there is any buildroot version compatible with the Linux kernel version 2.4. This can be easily fixed by searching within the git repository. However, I will have to manually port the binutils patches to correctly compile software for this unorthodox MIPS architecture. And this again is tedious.
I think the effort required to go further with this project is becoming too much and it is not worth it any more. Some progress has already been made by the OpenWrt folks albeit on a different processor revision (see links in the previous section) so I may reboot this project in the future.
All in all, I learned a lot already and no electronic devices were harmed in the process. So, even though I hit only 3 out of the 5 objectives I set at the start, I'm quite satisfied. It was still a valid learning experience. It's time to try to hack another router, maybe I will be luckier this time (stay tuned).
References
[2] Hacking Reolink Cameras For Fun and Profit
[3] FCC Equipment Authorization Procedures
[6] Bus Pirate - Dangerous Prototypes
[8] ISP - flashrom
[9] GitHub - devttys0/sasquatch
[10] SquashFS - Wikipedia
[11] Device file
[13] Netis GPL Code
[14] mkimg.sh on GitHub
[16] Lexra - LinuxMIPS
